The Dodo Blog
How to avoid stiff felt
Have you ever had your felt become too stiff? Have you wondered why that happens? Have you tried making it thinner, but ended up with a lot of holes? These are common issues that many felt makers face. Let’s have a look at how to solve that, so that you never have to waste all those beautiful materials again.
I find there are many misconceptions about how to avoid making your felt too stiff. So, to start, I want to have a look at some of the most common ones.
Misconception #1 – There’s a certain number of layers I have to use for a particular item
You see, the thing is that it’s not about the layers. Please don’t ask how many layers are needed for a piece! Someone else’s layers may be much thicker or thinner than yours. So, what you need to know is how much wool to use. You don’t believe me? Then, try this:
- On a 25 cm square (or 10-inch square), lay out 4g divided into 4 layers. Then felt it.
- Next, do the same, but with 12g. So, on a 25 cm square, lay out 12g divided into 4 l ...
An original gift for someone who loves wet felting

Are you looking for an original gift for someone who loves wet felting?
Look no further! Now, you can also purchase ANY of these classes as a gift for someone you love.
How does this work?
1. Click the links below to go to each course page.
2. Click the BUY NOW button to be taken to the checkout page.
3. On the checkout page, select SEND AS A GIFT.

4. This will open up a gift menu, where you’ll enter the EMAIL ADDRESS of the person you’re sending this present to. You can also add a GIFT MESSAGE if you’d like, as well as SCHEDULE THE GIFT DELIVERY.

5. Then fill out the checkout form with your information and payment details and complete the purchase.
What will your gift recipient see?
6. Once the gift has been delivered to the recipient's email inbox, they must click the email and accept the gift. Once the gift has been accepted, they will be prompted to create a login and...
Special offer for 4 of my most requested classes

When I created THE DODO HUB, my year-long program, in 2023, many felt makers said that one year was too long for them. But they were interested in some of the topics covered in the program.
So, to give everyone the chance to participate, I started offering some of the classes separately. You’d get access to the class materials for 3 months and have a private Facebook group where you could ask questions and share photos of your work.
But many people aren’t on FB anymore and, to tell you the truth, I’m not happy with FB either. So, I’ve spent some time creating a better solution. And that’s what I have for you today. Plus, I’m offering it to you for a special price right now.
The registration for 4 classes is open as of today.


And, from now on, you get life-time access. So, you don’t have to worry if you can’t go through the materials in the next couple of months. You can take the classes whenever you want.
You also don’t have to be on Facebook anymore. You can get support f...
Create delightful Christmas ornaments (and recycle you felt leftovers)

THE STORY BEHIND THIS PROJECT
I belong to a small felt club that gets together once a month via Zoom to felt in a group setting.
In our December meeting, the suggestion was that we create seasonal pieces. We usually felt 3D/sculptural items, and that was planned for December as well. But even though we work on a certain topic each month, we do have much creative freedom in the group. So, this time I thought of doing something slightly different.
I have tons of felt leftovers from many projects along the years, and I wanted to do something seasonal by recycling what I already had, instead of producing something entirely new. These bits accumulate with time, and it bothers me to see so much material not be used.

So, I gathered the thicker white felt leftovers (some of which was Nuno felt, which made it even more interesting), as well as some fun “Christmassy” templates I also already had from past projects. And, without having a clear initial idea, I started cutting the flat felt i...
21 favorite books from my wet felting library

In over two decades as a felt maker, I’ve been slowly collecting books on felting, to grow my knowledge, get inspiration or just know more about the pioneers of this beautiful art form. My felting library now has over 50 books, some of which I've been sharing with you on my blog and social media channels.
Since so many people have shown interest in my recommendations and in knowing what’s available, I thought you might like to get a list of the top 21 in my wet felting library. Note that some of them are in English, others in German, and some in both languages. Most books that were originally published in German, unfortunately don’t have English translations.
I’ve selected these 21 books based on the quality of the information they provide, the innovative projects they present, as well as their aesthetics. This list is now available here for you to download.
I hope you find this a useful resource.
Enjoy!
Wet felting with local wool

When we start wet felting, there is so much to learn about the many techniques that fit under this wider umbrella, that this alone can be enough for felt makers to focus on, without ever taking a deep dive into the attributes of the fibers from different sheep breeds.
So, often it’s people who have sheep or who live in rural areas, who – early in the process – start looking at how to use the wool of local breeds in their felting, as a way to take advantage of what’s available in their closest environment.
For those of us who live in cities, it’s impractical (or even unthinkable) to buy raw wool, clean it in the bathtub, and do all the processing in an apartment. So, we resort to buying processed wool from suppliers, and so are restricted to the available breeds.
Like me, you may very well be in this second group of felt makers. And, if you are – like me – you probably haven’t spent much time looking at the incredible number of different wool types that are available throughout the w...
How to stiffen wet felted items
I don’t use stiffeners often. But sometimes they can be useful, especially for sculptural wet felting. The problem with stiffeners is finding one that doesn’t make your work very hard, and still lets your felt look natural.
As in many other aspects of felt making, there are different opinions about this. Mine is that using a stiffener should never mean having your work look like plastic, and the stiffener itself should be as natural as possible.
I’ve researched this topic over the years, looking at information from milliners, as well as at solutions from crafters to harden textiles. But I have to say the suggestions I found never quite fit what I was looking for. There’s much online about sugar water or using starches made of corn or wheat flower, as well as several very chemical products used by milliners.
The first idea that made sense to me was a suggestion from a fellow felt maker, who recommended Arabic gum. My research quickly showed me it wasn’t an expensive product. So, I de...
Book recommendation “Kleidung Filzen”

As you know, garments are among the most difficult items to felt. Correctly calculating the shrinkage rate for such big pieces and guaranteeing the clothes will fit the wearer aren’t easy tasks and require precise work.
So, every felt maker realizes it takes a lot of expertise (and I’d even say some bravery 😊) to take on such a complex project.
Nevertheless, it’s tempting to want to try. Even if you don’t intend to felt garments professionally, I bet at some time or another you’ve thought about making a piece of clothing you could proudly wear. Am I right?
For the reasons I’ve mentioned and because I don’t have enough room at home, until now I’ve only felted some simple sweaters designed from knit ones I already owned.

But, with Winter about to arrive, I’ve been thinking about how much I’d like to make my own wet felted jacket.
So, I decided to finally order a book that’s been on my ‘to buy list’ for long. And I’m glad I did because it’s probably the best book I’ve ever seen abo...
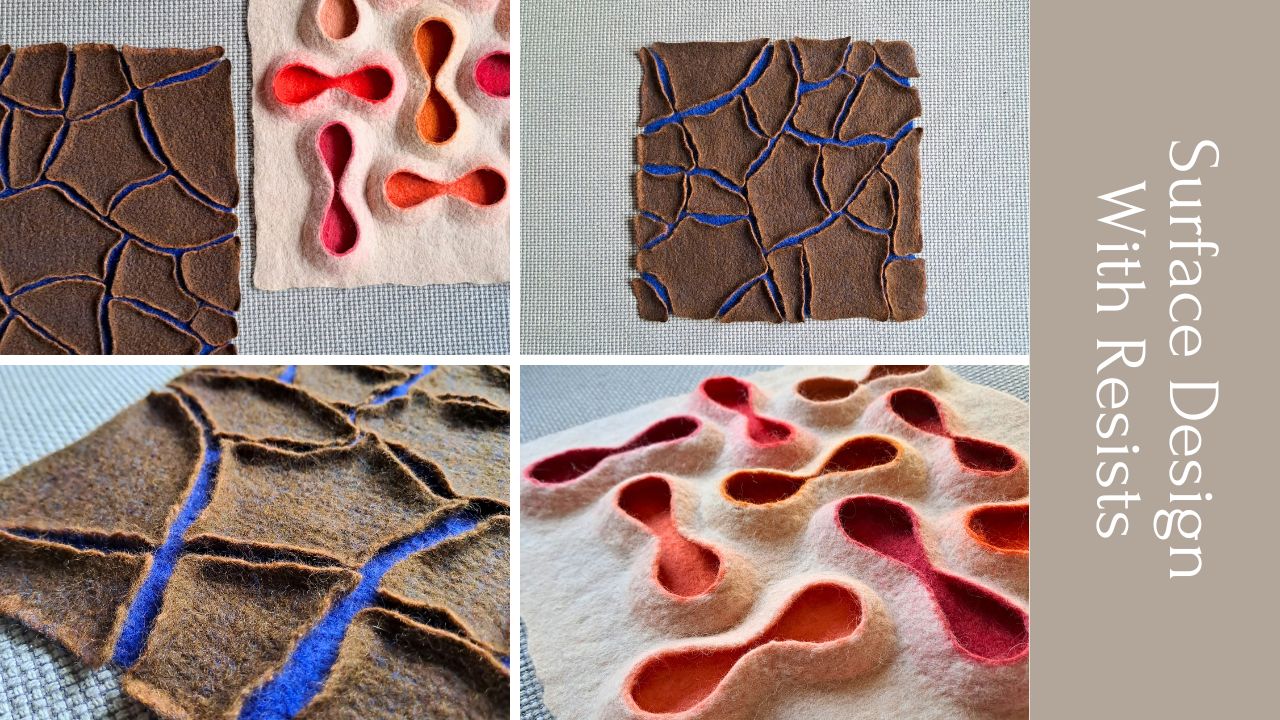
The Star Anise Seed Pod class is back!

You may have seen the images of my anise pod and have been curious about how the shape is created. If that’s the case, I have good news. The class is available again!
About one year ago I opened this course for registration for the first time.
As you may know, I initially created it as part of the lessons on book resists in the THE DODO HUB annual program. But the particular shape of the piece caused curiosity, so I decided to open it up for non-members of TDH as well.

The registration is open until Friday (October 4th).
You’ll not only be learning how to wet felt this beautiful seed pod, but you’ll also learn to design a book resist for your own project.
If it sounds interesting to you, but you have questions that aren’t covered on the course page, send me an email and let me know how I can help.
7 tips to avoid ridges on 3D felt
Have you ever felted a vessel, a bag or another 3D item and found that you couldn’t get rid of the seams on the sides? Did you wonder why it happened? Did you think that those seams could have been prevented by filling the piece with a balloon or any other object?
If that’s the case, know that the issues started way before the final shaping and drying phase. And so, no filling the piece in the end would have made it flat.
Today I bring you 7 tips that can help!
Once you have those pesky side ridges on your 3D felt, it’s very difficult to get rid of them. Sure, rubbing the seam area can help, but the problem happens in the layout phase, as well as the initial phase of the felting process. So, rubbing won’t completely solve the problem. Let’s have a look at was does help.
IN THE LAYOUT PHASE
There are two things to watch for during the layout phase:
1. The layout on the edge
From my point of view, there are 2 ways you can do the layout on the edges.

If you know you lay ou...

