The Dodo Blog
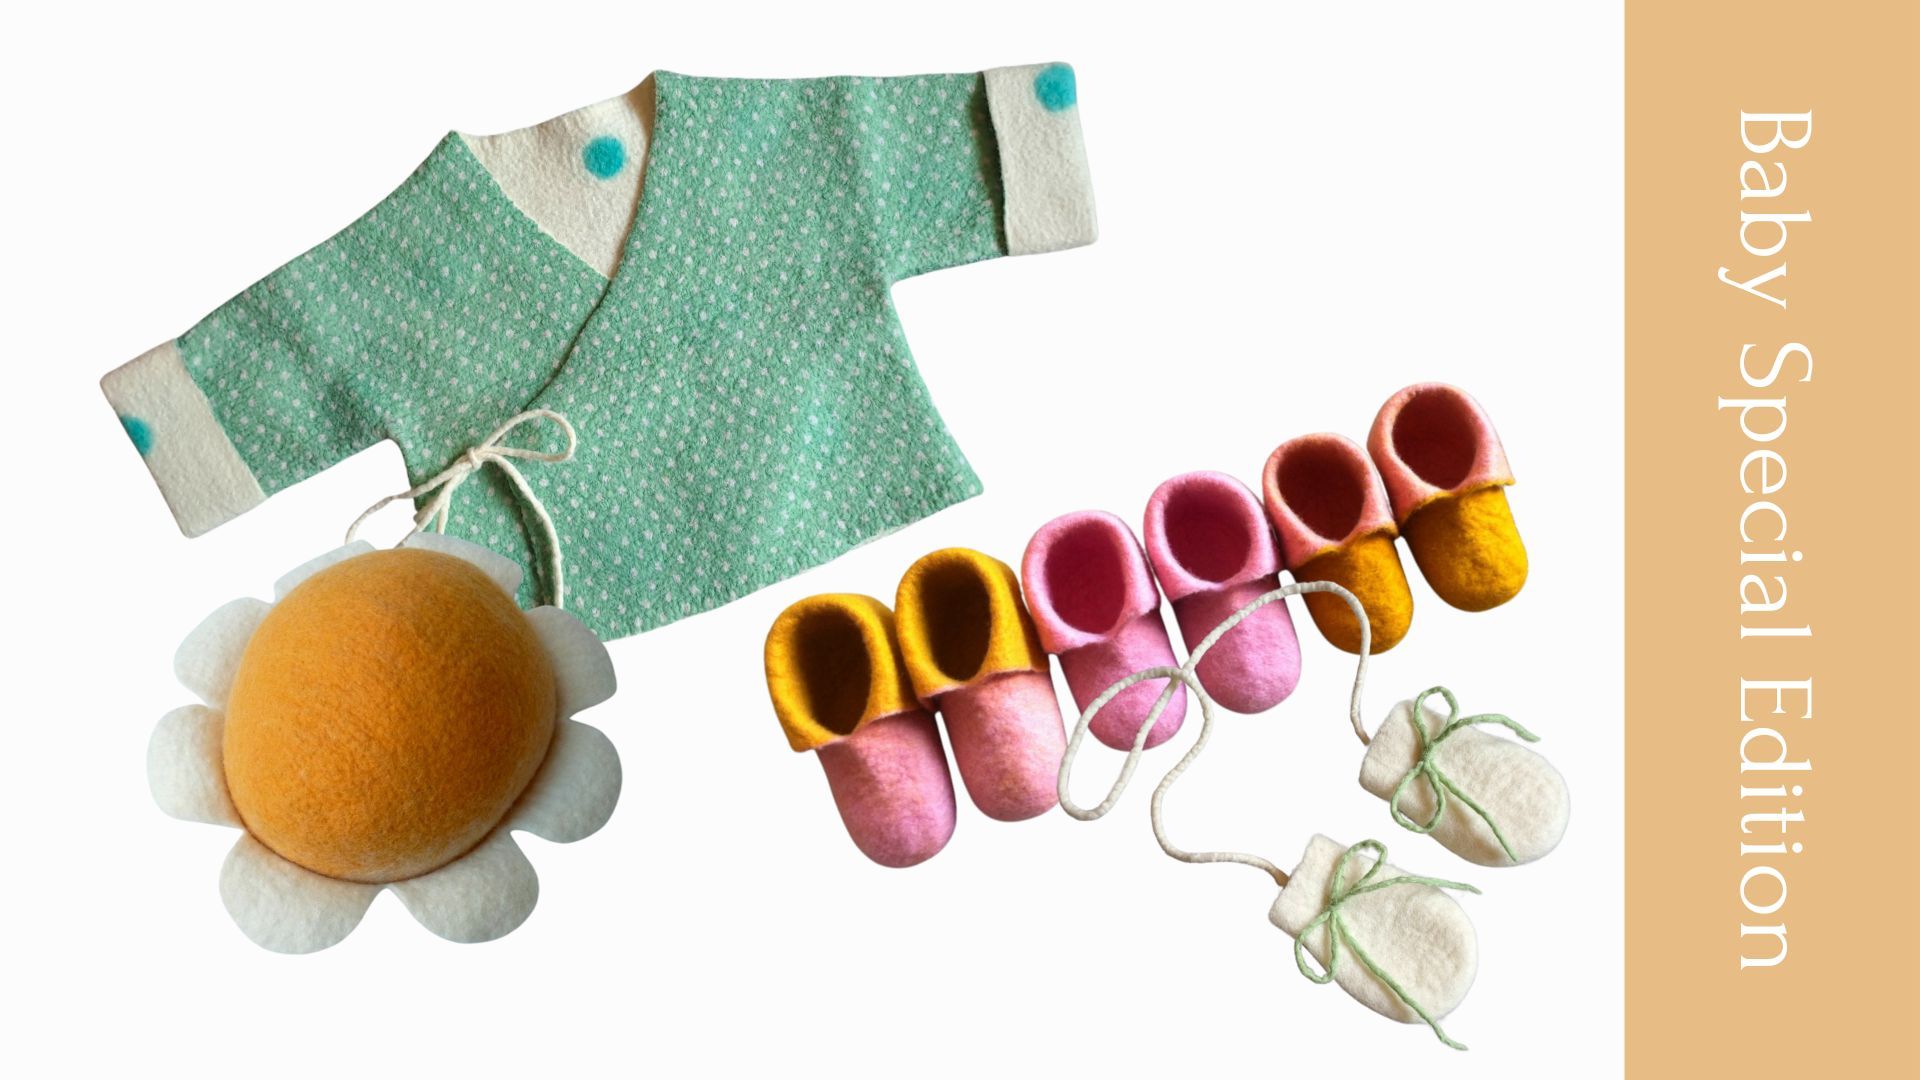
What’s inside the Baby Special Edition?
This is a question I know you’re asking yourself: Is the Baby Special Edition worth it?
That’s, of course, something only you can decide. But skimming through the class description will only give you a general idea. So, I’ve made a video to show you exactly what’s inside the “baby package”.
It’s divided into 4 parts:
Part 1 includes the step-by-step video instructions, that walk you through all you need to know to felt your baby's jacket in 3 design variations and 3 sizes to keep up with your baby’s growth. You’ll get:
- 5 PDFs with the pattern in 3 sizes (0 to 3 months, 3 to 6 months and 6 to 9 months) and the 3 design variations
- PDF with the instructions on how to use the patterns
- PDF with introduction to the course
- PDF with video transcripts
- 12 downloadable videos
In Part 2 you get the step-by-step video instructions showing you how to make a baby hat in 6 sizes that you can change in color and shape to create different designs. You’ll get:
- PDF with pattern in 6 si...
Special price for a limited time
Today I’m bringing you something special, the Baby Special Edition.
Usually, you can only get these classes separately.
Now, for a limited time, I’m combining the Sweet Baby Jacket & Daisy Baby Hat with the Comfy Baby Booties & Tiny Baby Mittens in one package. In other words, you get 2 for the price of 1.
If you’re interested in felting baby items as gifts for family members, friends or to sell, this Baby Special Edition is for you.

How to make fine felt and flexible with silk AKA nuno felt
In the last couple of weeks, we’ve been talking about different ways to make a fine and flexible.
We started by using only Merino wool. In the next sample we worked with Merino wool mixed with viscose fiber. And today I’m going to make a sample that’s going to be useful to compare with the one we did last week, the one with viscose.
What I’m going to do is I’ll be using the same template, 4 g of Merino wool, plus a piece of chiffon silk.
We’ll start by felting the sample and, when it’s ready, we’ll see how it compares to the previous two.
Make sure you stay until the end to be able to see the differences between the 3 samples. And, if you haven’t yet, go and watch the previous videos:
- How to avoid stiff felt
- A detailed tutorial on how to make fine and flexible felt
- A second method to make fine and flexible felt
This was a very complete series, and we’ve covered not only how to make a fine and flexible felt, but also how to add viscose fiber to your wool and, actually, how t...
What are participants felting inside The Dodo Hub?
So you had a look at the program, and now you’re thinking “Yes, one technique a month. But what do we really felt inside THE DODO HUB?”
I get that it may not be totally clear to you, so let me help you with that.
First, above there's a short video of some of the beautiful pieces made by the participants in the first months of THE DODO HUB to show you what you’ll be working on.
I want you to feel supported and that you’re in the right place, no matter where you are on your felting journey. So, THE DODO HUB adapts to the students and not the other way around.
Let me show you how, based on the example of module #1, Geometric Patterns. It’s planned like this:
- Week 1: Making samples (experiment with different techniques)
- Week 2: Making a bag (applying the techniques in 3D)
- Week 3: Making a rug (in Nomad technique)
- Week 4: Main takeaways + develop your own project
You can approach this module (or any other module) any way you want:
- Follow the suggested sequence in one month o ...
The enrollment for THE DODO HUB is now open!
If you’ve been waiting to enroll in THE DODO HUB, I’ve got good news! The registration is open as of now.

Are you new to the DODO world, and not sure what THE DODO HUB is?
- It’s a comprehensive year-long program designed to take you from the intermediate level to an advanced and independent felt maker.
- Every month you get a module that gives you a deep understanding of a complex wet felting technique.
- You have the chance to felt multiple projects for each technique, share and discuss them in the community, as well as get feedback and support from me.

But there’s much more to THE DODO HUB. Have a look at this page to get all the details. And, as always, I’m here to answer any questions you may have. Just send me an email and let me know how I can help.
Book recommendation “Kleidung Filzen”

As you know, garments are among the most difficult items to felt. Correctly calculating the shrinkage rate for such big pieces and guaranteeing the clothes will fit the wearer aren’t easy tasks and require precise work.
So, every felt maker realizes it takes a lot of expertise (and I’d even say some bravery 😊) to take on such a complex project.
Nevertheless, it’s tempting to want to try. Even if you don’t intend to felt garments professionally, I bet at some time or another you’ve thought about making a piece of clothing you could proudly wear. Am I right?
For the reasons I’ve mentioned and because I don’t have enough room at home, until now I’ve only felted some simple sweaters designed from knit ones I already owned.

But, with Winter about to arrive, I’ve been thinking about how much I’d like to make my own wet felted jacket.
So, I decided to finally order a book that’s been on my ‘to buy list’ for long. And I’m glad I did because it’s probably the best book I’ve ever seen abo...
Participate in the creation of the class materials and get 20% off the 1st edition

I’m working on a new class that is meant to help felt makers go all the way (smoothly) from total beginner to intermediate. If you’ve recently started wet felting or you’ve been felting for a while, but still feel like there are many gaps in your knowledge, this may be for you.
But I’ll need some time until I can offer it, since I haven’t created it yet. I’m working on the class outline for now. And I’d like to invite you to participate in the creation of the class materials. Just click here or on the image below to access the list of topics. Please let me know which ones are important to you and what you think may still be missing.
Just a last note: I’m considering an intermediate felter, someone who knows all the fundamentals, and is able to confidently felt on a resist, knows how to add fiber, fabric and other materials for embellishment and texture. All this while achieving high quality felt.
Thank you for taking a moment to answer the questions! To show you my appreciation for ...
Wet felt your baby booties, mittens, jackets & hats!

Have you noticed the BABY classes are back?
Many of you have been asking to have the baby booties class separately. You’ve also showed interest in having it available “on demand”, which is understandable, since babies grow fast 😊
So, I’ve listened to your requests and created two separate classes: “Comfy Baby Booties & Tiny Baby Mittens” and “Sweet Baby Jacket & Daisy baby Hat”. They’re already available and can be purchased at any time.
They’re now in a DIY version, and the videos and PDFs are downloadable. Just click on the images below to be taken to the course information.


Whether you’re planning to enroll in the class or not, here’s some information that may be useful for you.
As I reopened the baby courses to enrolment, it was brought to my attention that some of the designs are not compliant with the safety standards of many countries. I was very grateful for these contacts, since this is something I was previously unaware of.
I decided to do some internet research to un...
How to use prefelts
I think the importance of prefelts in wet felting is sometimes underestimated. Prefelts are extremely useful and there’s no end to how you can apply them in your wet felting projects. So, mastering how to make them exactly as you want for a particular piece can massively improve your work.
Let’s have a look at some of the many ways prefelts can be used, as well as a couple of tips to apply them successfully.
PREFELTS FOR NUNO FELTING

In most cases, nuno felted pieces decorated with crisp designs are created with prefelts. But prefelts are a bit more difficult to attach to silk than unfelted wool.
So, to make it work, you need to:
- use thin prefelts,
- felt slowly and gently,
- and work with cold water,
to give the wool fibers time to migrate into the silk.
The most effective felting technique in this case is sanding, since it creates a lot of pressure, that accelerates the fiber migration through the fabric.
If you run into issues, and some parts of your prefelts aren’t a...
Who invented nuno felting?
As you know, wet felting has a long History. But it’s also true that some of the most incredible advancements only happened in the last decades.
After wet felting was rediscovered as a promising material for designers sometime in the 80s, people of all backgrounds have picked it up and reshaped it with fresh ideas.
We’re all incredibly lucky that some amazing creatives have explored this ancient technique and given it their own touch, adding other materials to wool, and fusing other textile techniques with felt.
I think we shouldn’t take this for granted, so I’m always interested in discovering who are the artists responsible for this rich world we now have at our fingertips.
One of these amazing artists is Polly Stirling. You might not know who she is. But I’m sure you know the technique she created. Polly is none other than the inventor of nuno felting.
Need I say anything else?
If you are interested in knowing how it all happened, here’s a video interview with her, where she t...

