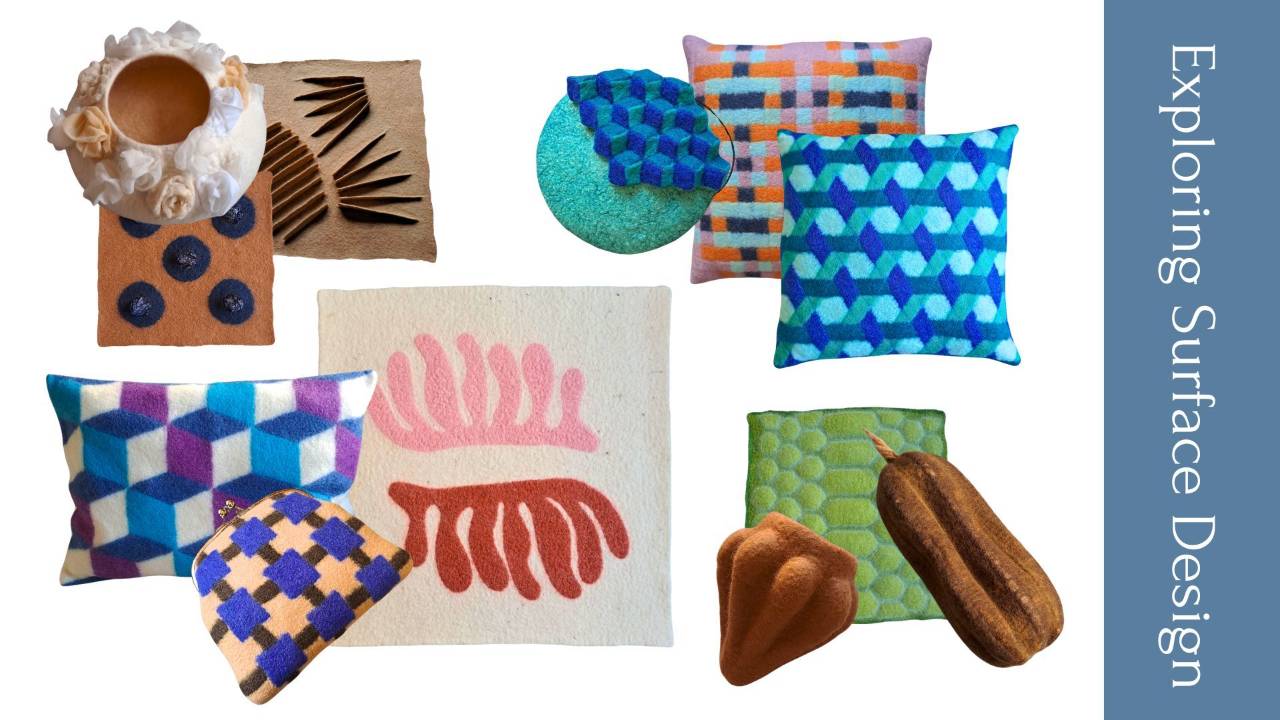
Click here to get fresh tips, video instructions, news about class registrations, as well as exclusive promotions directly into your inbox.

The Dodo Blog

Create delightful Christmas ornaments (and recycle you felt leftovers)

Nov 10, 2024

THE STORY BEHIND THIS PROJECT

I belong to a small felt club that gets together once a month via Zoom to felt in a group setting.

In our December meeting, the suggestion was that we create seasonal pieces. We usually felt 3D/sculptural items, and that was planned for December as well. But even though we work on a certain topic each month, we do have much creative freedom in the group. So, this time I thought of doing something slightly different.

I have tons of felt leftovers from many projects along the years, and I wanted to do something seasonal by recycling what I already had, instead of producing something entirely new. These bits accumulate with time, and it bothers me to see so much material not be used.

So, I gathered the thicker white felt leftovers (some of which was Nuno felt, which made it even more interesting), as well as some fun ā€œChristmassyā€ templates I also already had from past projects. And, without having a clear initial idea, I started cutting the flat felt i...

Continue Reading...

Free Easter felting tutorial

Mar 10, 2024
 

This year, make your Easter gifts extra special!

Hereā€™s a sweet tutorial to help you gift some extra love this Easter šŸ˜Š

Ā 

WHAT DO YOU NEED FOR THE BUNNIES?

That will depend on how many you want to make. So, Iā€™ll just give you the list of materials for 4 bunnies like mine. You can adapt the colors and/or decoration to your own taste.

  • 40 cm of green ribbon
  • 40 cm of pink ribbon
  • 2 small bells
  • 2 sew-on strass pieces
  • Green and pink thread
  • A thin needle (that can pass through the holes of the strass)
  • A thimble
  • 2 thin felting needles
  • Felting foam
  • Some white fine merino wool
  • 2 thick (about 7 mm thick) sheets of pre-felt (pink and dark brown); each of them should be big enough to cut 2 bunnies
  • The pattern
  • Some gold and silver thread

INSTRUCTIONS

Start by making the pre-felt with your wool of choice. I canā€™t say exactly how many layers you need, since thatā€™ll depend on how thick you lay your wool. But 4 should do if youā€™re working with thick layers.

Cut 2 bunnies in pi...

Continue Reading...

Wet Felting Demonstration: 3 Layouts For Batts

Nov 21, 2021

Iā€™m really excited about this weekā€™s topic because I find there arenā€™t many wet felters exploring it. And thatā€™s the usage of batts for wet felting.

Batts are more commonly used in needle felting, but theyā€™re definetely worth exploring in wet felting too.

When applied right, batts can:

  • save you so much time and effort, since the layout is a lot less laborious than it is for tops
  • help you achieve a more even layout

Also, if you're open to wet felting with batts as well as tops, you'll have a wider choice in colors, since often suppliers have a different color palett for batts and tops. And, in my experience, they produce a felt that is a bit different from the one made with tops: less shiny but smoother.

These are 3 new lessons about 3 different ways to lay wool batts, when to use them, as well as the advantages of working with them.

So, if this is something that sparks interest for you, you can access this weekā€™s lessons by signing up for the Free Felting Membership, The D...

Continue Reading...

New Free Felting Membership

Nov 07, 2021

Yes! That's right. I've been working on aĀ free felting membership and it's now available for you to enjoy :)

You see, Iā€™ve been blogging and vlogging about wet felting for over a decade. And what Iā€™ve noticed is that in those formats, itā€™s easy to lose track of what Iā€™ve already covered since the information is scattered everywhere.

I also wanted a place where you could ask me questions in a way that other felters could also benefit from the answers. So, after considering the pros and cons of the different platforms, I decided this would be the best way to have everything under the same roof.

It's calledĀ The Dodo Sandbox because it's a place for you to play, experiment and grow your felting skills :)

The membership area is divided into the ā€œcore trainingā€ and different chapters or modules, each dedicated to a different topic. When you enter the membersā€™ area, thatā€™s exactly what you see.

Of course, Iā€™ll be creating new modules about other topics as I see what your needs are. And...

Continue Reading...

How To Recycle Felted Wool To Fill New Pieces

Oct 18, 2017
 

Today Iā€™ve got a short video for you.

Itā€™s on a subject that I havenā€™t heard anyone talk about yet: recycling felted wool rests.

It might not seem very important to you, if youā€™re just starting out with felting. But if itā€™s something you do on a regular basis, I bet youā€™ve already asked yourself what you should do with all those bits and pieces that you got from cutting parts off your projects or from items that just didnā€™t turn out the way you expected.

To me this is really something important. I work with high quality wool (with the certifications Ɩko-TexĀ® Standard 100 and Global Organic Textile Standard), so it would never cross my mind to throw away any rests. I keep every little bit, even the pieces my students donā€™t want to save, when Iā€™m teaching live workshops ? This means I ended up with bags full of all shapes and colors, and I really wanted to do something with them.

When I started filming my latest felting workshop, I decided it was time to reuse all this wool I had. An...

Continue Reading...

Recycle Felt Rests And Make A Sweet Gift

Mar 08, 2017

No matter if youā€™re just starting out or if youā€™re an experienced felt maker. Whether something goes wrong with a project or youā€™ve made a pre-felt and didnā€™t use it all, there are always felt rests.Ā Mine keep increasing! I have lots of bags with pieces in all colors and sizes. And I tell everyone whoā€™s ever attended one of my workshops not to throw anything away. The way I see it, wool is too precious to land in the garbage bin.

But, of course, whatā€™s the point in collecting them if you just keep having bigger bags?Ā So, hereā€™s an idea of a sweet and easy project you can make with something like a bag that went wrong (I have lots of those too). All you need is a piece with 10 to 12 cm, depending on the template you choose.

Here are a couple of shapes I suggest. I used to make keyholders and magnets like this. They can be sweet and original gifts!

And these are some of the pieces I have in those bags I was talking about ?Ā Draw a silhouette you like on a piece of cardboard. Just m...

Continue Reading...
Close

50% Complete

I'll keep you updated

And let you know when there's a new blog post, tutorial or masterclass available.

Don't worry, I hate SPAM and promise to keep your email address safe.